 Slithy home
In the opengl/skeleton/ directory of the Slithy
distribution you'll find a simple, highly commented example called
"skeleton.c" that draws a rotatable 3D cube. The files
"slithygl.c" and "slithygl.h" have some utility
functions you'll need to get your code to talk to Slithy. The other
sample, in the opengl/polyhedron/ directory, has a
fancier diagram and a little mini-presentation that shows off various
ways to integrate it with other Slithy elements.
The basic idea is to build a parameterized diagram, only instead of
writing a Python function that uses Slithy's drawing library, you
write a C function that makes OpenGL calls directly. You'll need to
compile your C function into a shared library (.so in
Unix, .pyd in Windows), then it can be loaded into Python
using the import statement, just like other stuff written
in Python can.
skeleton.c has all the boilerplate you need for getting
this working. We'll walk through it section by section here.
#ifdef _DEBUG
#undef _DEBUG
#include <Python.h>
#define _DEBUG
#else
#include <Python.h>
#endif

#ifdef WIN32
#include <windows.h>
#endif

#include <GL/gl.h>
#include <GL/glu.h>

#include "slithygl.h"
Standard header stuff. The nonsense with _DEBUG is
necessary to let you use the debugger on Windows without installing
the debug versions of the Python DLLs. (You'll be able to debug your
own code, but not step into any of the Python library calls. This
probably won't be too much of a limitation.)
slithygl.c and slithygl.h contain all the
functions documented below. You'll want to use them.
static PyObject* cube_draw( PyObject* self, PyObject* args );

static PyMethodDef SkeletonMethods[] = {
    { "cube", cube_draw, METH_VARARGS },
    { NULL, NULL } };
The SkeletonMethods array
defines the mapping of Python functions to C functions. Here we see
that our module provides a single function to Python called "cube",
which is implemented by the C function "cube_draw". Your
module can have as many functions (diagrams) as you want; you just
need to make an entry for each one in the methods array. (Leave the
"{ NULL, NULL }" entry as the last item to mark
the end of the array.
void
#ifdef WIN32
__declspec( dllexport )
#endif
initskeleton( void )
{
    PyObject* m;
    PyObject* p;

    m = Py_InitModule( "skeleton", SkeletonMethods );

    p = make_opengl_diagram( m, "cube" );
    add_scalar_parameter( p, "x", 0.0, 1.0, 0.0 );
    add_scalar_parameter( p, "theta", 0.0, 360.0, 0.0 );
    Py_XDECREF( p );
}
You have to have a function called "initfoo" (all lowercase),
where "foo" is the name of the module (the final .so or .pyd file).
In it, you should call Py_InitModule() with the name of
the module an the method array. You'll get back a pointer to the
module object.
Next you have to describe each of the diagrams to Slithy. For each diagram:
make_opengl_diagram() to tell Slithy that
it is a parameterized diagram. You'll pass in the module object and
the name of the function (which must match the name in the methods
array). You'll get back a "parameter list object".
add_*_parameters()
functions. You'll pass the parameter list object you got in the
previous step, the parameter name, and its default value (and range,
for some parameter types). There are six functions that correspond to
the different parameter types:
void add_scalar_parameter( PyObject* plist, char* pname, double min, double max, double def );
void add_integer_parameter( PyObject* plist, char* pname, int min, int max, int def );
void add_color_parameter( PyObject* plist, char* pname, double r, double g, double b, double a );
void add_string_parameter( PyObject* plist, char* pname, char* def );
void add_boolean_parameter( PyObject* plist, char* pname, int def );
void add_object_parameter( PyObject* plist, char* pname, PyObject* def );
Slithy makes a copy of the def parameter to
add_string_parameter(); you don't have to keep the
string around after you pass it to this function.
Py_XDECREF()" on the parameter list object.
You will follow these steps for each parameterized diagram you have in the module. In this example, there's just one.
static PyObject* cube_draw( PyObject* self, PyObject* args )
{
    PyObject* dict;
    double aspect, alpha;
    double x, theta;

    if ( !PyArg_ParseTuple( args, "Odd", &dict, &aspect, &alpha ) )
	return NULL;
Now we'll start writing the drawing function itself. It will always
be called with three arguments: a dictionary of parameter values, the
aspect ratio of the viewport, and a suggested alpha value. You
are free to ignore the alpha value if you want, but using it will make
your OpenGL function respond to the fade_in() and
fade_out() animation commands like every other Slithy
object.
x and theta are variables needed by our
cube-drawing code.
    glMatrixMode( GL_PROJECTION );
    glScaled( aspect, 1.0, 1.0 );
When your function is called, the OpenGL projection will be set up so that the corners of the viewport are at (-aspect,-1) and (aspect,1). We'll stretch the projection so that the corners are (-1,-1) and (1,1) — this corresponds to the default projection when you open up a new OpenGL window.
You should not push or pop the projection matrix stack at any time in your function.
    glColor4d( 0.2, 0.2, 0.3, alpha );
    opengl_clear_color();
If you want to use the depth buffer, you must call one of the following two functions:
void opengl_clear_blank( void );
void opengl_clear_color( void );
Use these instead of glClear(). Both clear out the depth
buffer so it is ready for use (Slithy normally keeps object id
information in the depth buffer). The "color" version also clears the
viewport to the current OpenGL color. In this case, we're clearing
the viewport to dark blue. You can use
opengl_clear_color() with an alpha less than one in order
to have a semitransparent background.
Both these functions require the projection matrix to be scaled as above. (It's not done for you by the caller because you might want to do something in the original coordinate system.)
    gluPerspective( 25.0, aspect, 0.1, 30.0 );

    glMatrixMode( GL_MODELVIEW );
    glTranslated( 0.0, 0.0, -12.0 );
Now we'll use an ordinary gluPerspective() call to set up
a 3D viewing projection. Since this is multiplied onto the existing
projection, the result will be to set up the 3D projection within the
diagram's viewport.
The model-view stack can be used normally, including pushing and popping. The model-view matrix will be initialized to the identity matrix when your function is called. Here we dolly back to see something drawn at the origin.
glEnable( GL_DEPTH_TEST );
Depth testing is not on by default, so we have to enable it. You do not have to undo your changes to the OpenGL state; the caller will take care of it.
    x = get_scalar( dict, "x", 0.0 );
    theta = get_scalar( dict, "theta", 0.0 );
Here we will read values out of the parameter dictionary. There are six functions that do this, one for each parameter type:
double get_scalar( PyObject* dict, char* pname );
int get_integer( PyObject* dict, char* pname );
char* get_string( PyObject* dict, char* pname );
void get_color( PyObject* dict, char* pname, double color[4] );
int get_boolean( PyObject* dict, char* pname );
PyObject* get_object( PyObject* dict, char* pname );
The first argument is the dict object we obtained at the
top of the function. The second is the parameter name.
A few notes: The string returned by get_string() is a pointer into
Python-owned memory; it should not be freed, nor should the data it
points to be changed. get_color() fills in the array you
pass it with the RGBA values of the color object.
get_object() returns a borrowed reference (if you're
working with Python objects directly, you'll know what that means).
    glRotated( theta, 0.7, 0.4, -0.1 );

    glPushMatrix();
    glColor3d( 1.0, 0.0, 0.0 );
    draw_face( x );
    glColor3d( 0.0, 1.0, 1.0 );
    glRotated( 180.0, 1.0, 0.0, 0.0 );
    draw_face( x );
    glPopMatrix();
Now there's some perfectly ordinary OpenGL drawing code (some of which
has been omitted; see skeleton.c for the full
version). You can do pretty much anything you can in OpenGL,
except:
None:
    Py_INCREF( Py_None );
    return Py_None;
}
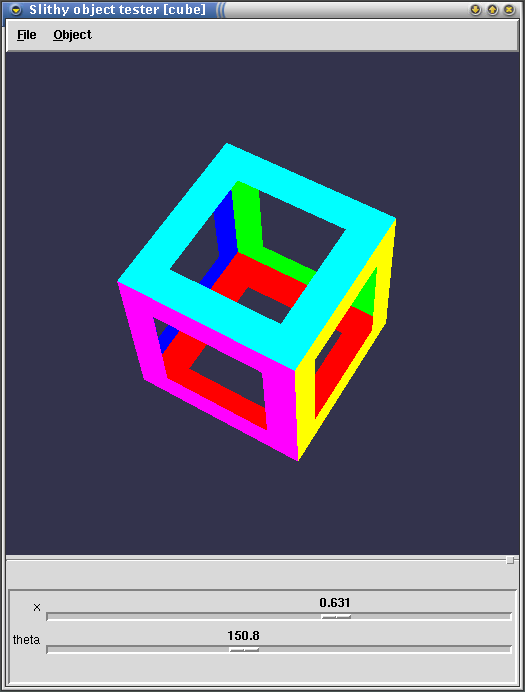
That's all there is to it. Once you've built it, your C parameterized diagram can be used just like any other. To test it, you'll need to use a simple little Python script:
from slithy.library import *
import skeleton
test_objects( skeleton.cube )
This imports your C diagram and passes it to
test_objects(), which should give you something like
this:
On Windows, you need to build the code as a DLL, linking against python22.lib, opengl32.lib, and glu32.lib. You also need to change the output filename to "foo.pyd" instead of "foo.dll".