
Celtic Knot Thingy > Explanation
From lasers to knots
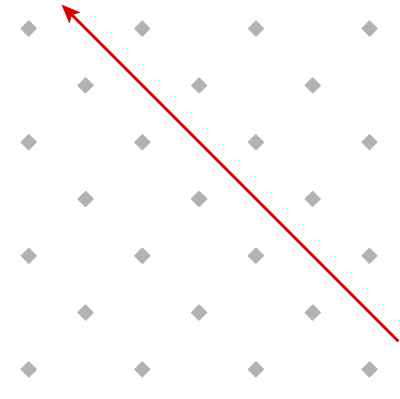
Imagine you have an infinitely large room with two overlapping grids of posts, represented by the gray diamonds. You shoot a laser down one of the diagonal "corridors" that marked out by the posts. The laser shoots off to infinity like this:
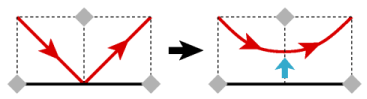
Now, you hang a flat mirror between two of the posts. The mirror has to go horizontally or vertically; any other orientation isn't allowed. Now the laser bounces once, shooting off down a different diagonal corridor:

To contain the laser, we'll put mirrors all along the edge (but still connecting posts horizontally or vertically). Now the laser beam never gets out. Eventually, it gets back to where it started after following a path with many bounces:
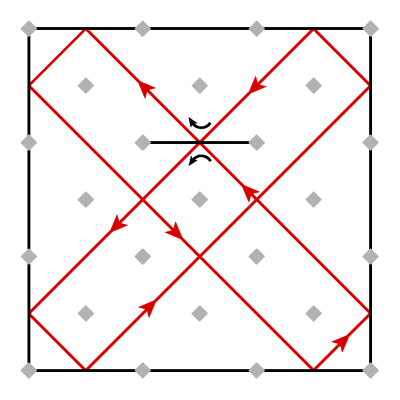
Note that the laser isn't going through that mirror out in the middle; it's bouncing off each side. (In this story, mirrors are reflective on the back, too.) The two bounces are indicated by curved black arrows.
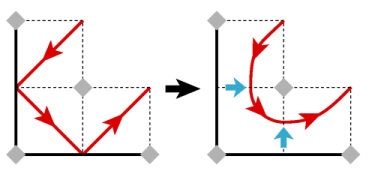
By adding more mirrors to the interior, we can make the path more complicated. Here we've added just one more mirror:
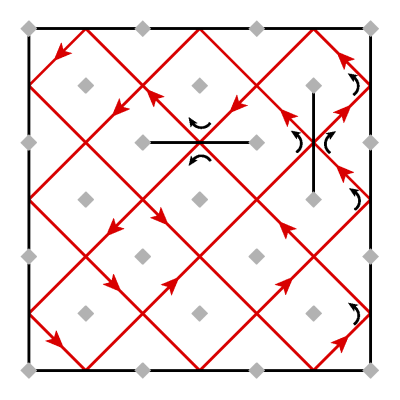
Again, the laser isn't going through that new mirror: on the left side, it bounces off once, while on the right side the laser wiggles up a three-bounce "hallway".
We can think of this diagram as being made up of a number of squares, each with two posts at opposite corners. Some squares have posts at northwest and southeast, while others have posts at southwest and northeast.
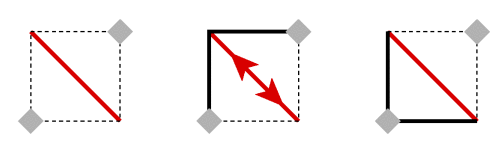
Notice that the laser always passes through a square diagonally, going through the two corners not occupied by posts (above image, left). Placing mirrors so that one of these corners is blocked (above, middle) is illegal: the laser would have to bounce in and out along the same path. This means that mirrors can't intersect -- you're not allowed to hang a mirror "through" another.
It's fine for a square to have mirrors on two of its sides; they just can't meet at a corner without a post. They can meet at a corner with a post, as shown above on the right, or be on opposite sides. You also can't have mirrors on three or four sides of a square (because that would block a corner without a post).
Our laser diagrams look kind of boxy and ugly. Let's enforce some artistic conventions for drawing how the laser passes through squares with various mirror configurations.
Our basic rule will be to "push" places where the laser bounces off a mirror away from the mirror surface, so that the laser passes through the side of the square rather than the corner. This never changes the ultimate "destination" of the laser, as the modification is purely local. The push is indicated in the above diagram with a blue arrow. In squares with just one mirror side, the laser gets turned into a gently sloping curve.
For a square where two mirrors meet at a corner, two pushes turn the diagonal line into a tight turn.
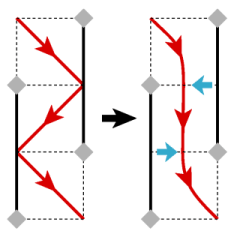
When a square has two mirrors on opposite sides, the pushes act to send the laser beam straight through the square, rather than diagonally.
Again, three or four mirrors on a square is not allowed, so we don't have to worry about how to draw that. If a square has no mirror sides, we'll just leave its laser beam as a diagonal line.
When all these conventions are observed in drawing the diagram, we get something like this:
Now it's starting to look like a knotwork design.
Note that every place the laser intersects itself, there are exactly two beams intersecting. Thus exactly four lines emerge from each intersection point: never three or five or anything else but four. This number is called the valence of the intersection point. It turns out that planar diagrams where all the vertices have valence 4, like these, can always be drawn interlaced. In an interlaced figure, one line goes "over" the other one at each crossing. Moreover, if you follow a path through the diagram, it will always alternate going over with going under. For some diagrams, satisfying this alternation requirement is impossible, but for our laser diagrams it will always work.
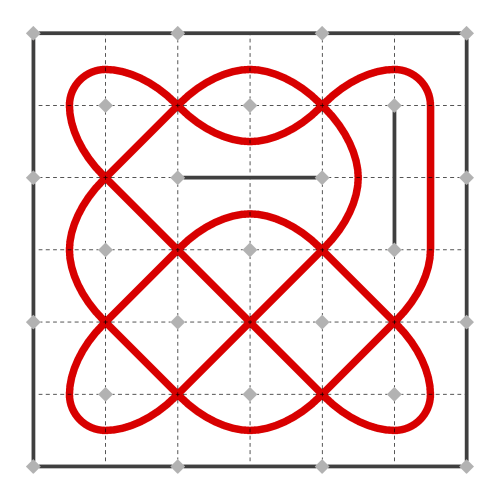
Here I've drawn the figure with interlacing (and removed all the construction lines).
Notice how if you follow the strand, it will always go over at one intersection and then under at the next. A simple change to the drawing style produces a more "Celtic" flavor to the design:
How CKT draws a knot
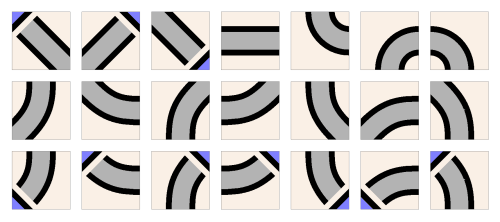
Once the system of break markers ("mirrors" in the laser beam analogy) is specified, generating a knot is fairly straightforward. For each square of the grid, CKT does a table lookup to determine what basic shape to place there. Here's a diagram of the complete table:
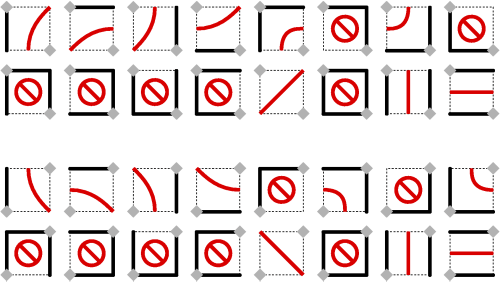
Ignoring interlacing for the moment, the contents of the square depend only on which sides are covered by break markers and the placement of the corner posts. Configurations marked with a slash and circle are illegal. CKT's user interface prevents configurations of breaks like this from being drawn.
If we just drew a simple line in each square as in the above diagram,
the knot would come out looking kind of plain, and we wouldn't get the
interlacing effect. The file start.ps defines a number
of procedures for drawing fancier versions of these basic shapes. To
see the test page, load start.ps itself into Ghostview.
(Or you can click here for the PDF version of
start.ps.)
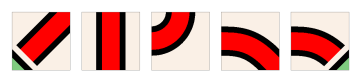
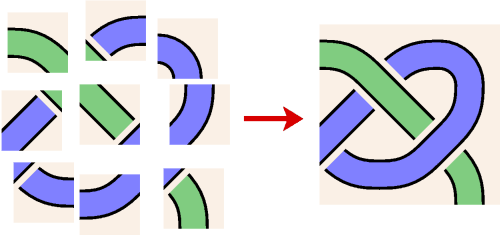
You'll see a table of 26 basic shapes I call knoxels (knot-pixels). Every knot is drawn simply by assembling the correct pattern of these shapes in a grid. Five of the shapes, shown in red on the test page, are fundamental:
The remaining 21 derived knoxels are simply rotations and reflections of one of the fundamental shapes:
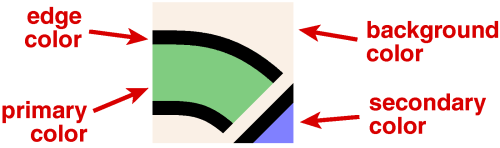
Each knoxel contains up to four different colors, as shown below. All knoxels of a design share the edge and background colors. Use of the primary and secondary colors allow strands of different color to cross over each other.
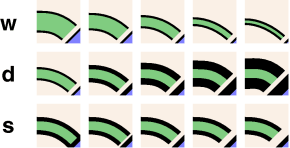
The knoxel-drawing procedures have three parameters, w, d, and s, that control the geometry of the shape. The effects of varying each of these is shown here:
By specifying primary and secondary colors appropriately, we can assemble the individual knoxels into an image of overlapping strands:
It turns out that it's very simple to determine how strands should interlace. Let's look at a correctly interlaced knot, and consider all the intersections in a single column (each column is marked with a red dashed line):
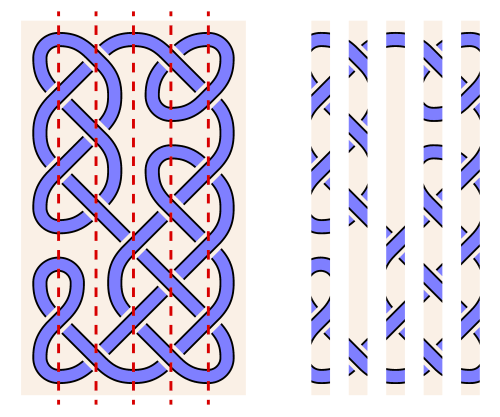
It's easier to see if we erase everything except the columns of intersections, as shown on the left. In the first column, all the intersections have the "over" strand running from southwest to northeast. In the next column all the intersections go the other way, and so on. All the intersections in a particular column are oriented the same way, and the orientations alternate between columns!
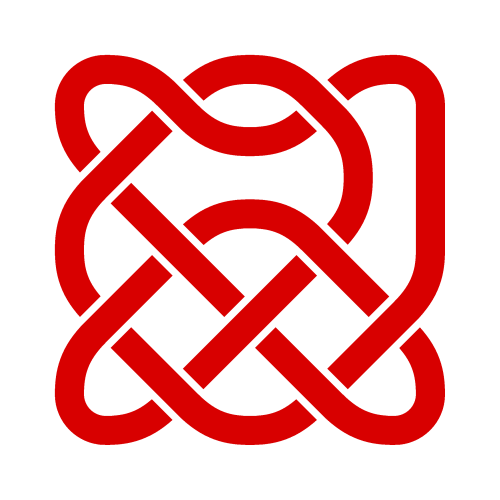
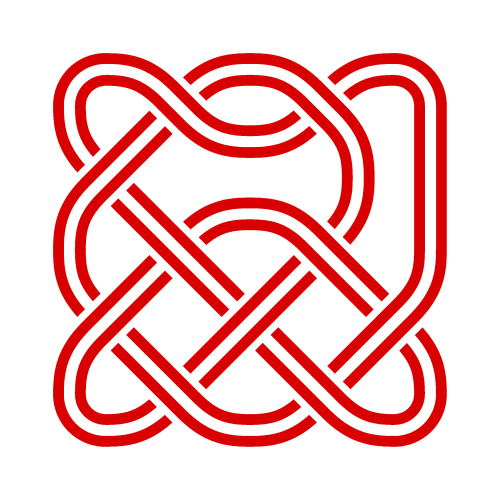
This property makes it easy to draw interlacings. If the knoxel is in an even-numbered column (counting from column 0 on the left) then CKT picks the knoxel that goes "over" on the right side. Odd-numbered knoxel columns have "over" on the left. This choice is arbitrary. The opposite choice produces a knot where all the "overs" are changed to "unders" and vice versa, which is also a valid interlacing. Here are two knots constructed with the same breaks:

Only the choice of interlacing is different. There's also nothing special about making the choice based on the column. If you look, you'll see that all the intersections in a row are oriented the same way, as well. Choosing based on row is equivalent to choosing based on column.
Ok, it's time for me to get back to my real work now...